Search

Hazel Loves Crafts

Author

Hazel Loves Crafts

I love crafts. I love trying new things and I spend hours on my tried and tested fall-back hobbies. Hazel is my house rabbit who helps me with all my crafting fun in her own special way! I’ve been doing cross stitch as long as I can remember (finished my first project - a long stitch Puffing Billy - when I was 5), but tend to find I’ve got piles of lovely completed pictures with no idea what to do with them! When I got married, I made my own wedding invitations, and thus began an interest in card making. After a year or so, I bought a scrapbook and fell in love with the idea of preserving memories with such personal touches. I’ve created scrapbooks for friends and family and continue to make cards almost obsessively. My hobbies do seem to be hard on the wallet, and on space, and thus was born my Thrifty Crafting Pledge… I pledge to not buy any further crafting goodies, to use my existing stash, to learn new ways to use what I have and to reuse and recycle for the next 12 months.

Thrifty tips

My Thrifty Crafting Pledge is leading me to really concentrate on the ways I get the most from my craft stash. I thought I’d make a list of nifty thrifty tips and share it with you. Hopefully other people have some tips which would help us all as well.

– Remove the centre of pieces of expensive card stock when using them for matting and layering. This way, the effect of matting and layering remains, but I am left with more card stock for another time – this works time and time again, saving me several pennies each time!

– Cut the ribbons intended to help hang clothes out (stops them from sticking out and/or tickling you) AND you can use them for embellishments on cards and scrapbooks.

– Make scraps your best friends. They are so versatile, can be used as the main feature of a card, or punched into, used for matting and layering etc etc (picture, link to Pinterest***********)

– Use the packaging! Not only is it free, but often it is absolutely perfect for the feel of the stamp or embossing folder you have. (****pictures****)

– Don’t throw away your mistakes.
~Try clever placement of embellishments to disguise errors
~Re-cover with new card stock and start again
~If it is irredeemable, can you turn it over and use the back? If it is a whole card front, remove the back and use it for stamping or matting and layering at a later date

– Look around you for things you can repurpose. I love making roll-up flowers from envelopes and old magazine pages

– Be organised.
~It’s much easier to find what you’ve got if it’s together, or follows your personal logic (I stick an envelope in with a paper stack and keep the scraps from that range in there, my best friend stores her fabric scraps by colour)
~ Plan cards to make the most of your paper. There are loads of one-page-wonder posts on the internet and on Pinterest which can help you get the hang of seeing multiple cards in one sheet.

– Don’t be afraid to cut into your die cuts and punched shapes – it opens up a huge number of other ways you can use them ********

– Use the ‘negative’ left after you die cut. ********

– Mask off bits of your stamps to open up other uses *******

– Look to other people for inspiration on how to use your stash. There are loads of websites where you can see how other people have used stamp sets and often I haven’t thought to use it for that occasion (docrafts website, Pinterest, ***that website you tell it which stamp set you have etc******

Elegant Christmas easel card using pyramage design

image

My copy of Making Cards Christmas Special 2015 arrived about 2 weeks ago. I have spent many happy hours playing with the fabulous free papers which came with it.

This is one of the many cards I have made so far, and I thought I would share with you how I made it.

You will need:
– 7×7 white card blank
– Making Cards Christmas special 2015 free papers
– silver mirricard
– pale blue satin cardstock
– 3d foam pads
– blue glitter glue

How to:
1) Create your easel base by scoring a line parallel to centre fold of card blank at 11cm from open edge and mountain folding along this line.
2) Cut a piece of blue satin cardstock to fit the card blank. I wanted a slight white border so I used a 17x17cm square.
3) Cut a piece of blue snowflake paper (from Making Cards Christmas special 2015 free papers) to slightly smaller than blue cardstock and stick down. I wanted a larger border so I used a 16x16cm piece, but you can play with measurement as you want.
4) Fasten blue square to inside face of card blank. I like to put the card, unfolded, under a heavy book at this point to ensure a neat, well-stuck finish.
5) Cut a piece of silver mirricard to fit the folded down easel. Mine was 17×8.5cm, I like to leave some of the card blank as a border.
6) Cut a second piece of blue cardstock to slightly smaller than silver piece and stick down. I chose to only have borders at the sides so my blue card was 16.5×8.5cm
7) Cut a piece of blue snowflake paper to slightly smaller than  blue cardstock and stick down. Mine was 16.2×8.2cm, but play with measurement for different border size.
8) Cut out the three winter tree scenes from the Making Cards papers. Use foam pads to attach the middle size to the largest, then smallest on top. Using Pritt Stick, attach to piece of silver mirricard 10.8×8.4cm.
9) Attach tree pyramage to folded down section card, ensuring there is some of the topper standing proud of the main card. I used Pritt Stick to attach mine with a 1.5cm overlap.
10) Cut out ‘Merry Christmas’ sentiment from Making Cards free papers and attach to a piece of silver mirricard 9.3x4cm. Use foam pads to attach to centre of easel base, mine was 2.4cm away from front edge. This will act as anchor when easel is open.
11) Use blue glitter glue to add any required detail. I put a dot in each corner of my easel top and the sentiment and added glitter accents to the trees.

September monthly roundup

Well, one thing I have learnt this month is to not schedule posts without double-checking I’ve got the Year right!

I got back from my holidays to find that none of the schedule have been uploaded. We and learn.

I am now two months into my Thrifty Crafting Pledge, and I very proud of how well I have done so far for not buying anything. Hubby has not been as helpful as he could be, lots of ‘it’s only a couple of pounds’ comments(who would have thought he would be tempting me to buy?!).

Anyway. This is my September roundup:
Bought:
2 Pritt Sticks
24 sheets of Satin Card in bold colours from Create and Craft
Made:
1 file store using an old cereal box
10 Christmas cards using Hunkydory Santa Paws collection
5 Christmas cards using free gift from Cardmaking and Papercraft issue 148 (lovely robin stamp, embossing folders etc).
4 8×8 scrapbook pages
4 birthday cards.

This has been a busy month with non-crafty ventures. I had a job interview, lots and lots of reading and researching for that, meaning far less time to play. Also, we’ll be off to Portugal on Sat 26th, first holiday since the honeymoon, really excited.

Simple anniversary card tutorial

image

I was asked to make an anniversary card for my mother’s friend’s 38th wedding anniversary. I have made several anniversary cards in the past, but they have all been for people who were much younger and my normal style did not seem appropriate for such an advanced anniversary. I decided to opt for a very simple but elegant design.

You will need:
– card blank. You will need the card blank in the portrait position (I chose a C5 card blank, meaning it is 14.7 by 21 centimetres).
– 2 colours of card stock (I used a pearlescent lilac and a pearlescent cream card from Create and Craft)
– mirricard (I chose silver)
– heart shaped die and a die cutting machine
– 2 embossing folders ( I used the frill passes which came free with my big shot machine, and a Regency-style embossing folder which came free with last month’s edition of Cardmaking and Papercraft)
– narrow ribbon ( I chose cream to match the second card choice)
– anniversary stamp
– small heart punch
– Pritt stick, double-sided sticky tape

1) Cut a piece of mirricard to14.2 by 20.6 centimetres and attach to front of card blank. I personally like to cut the middle out of the matting and layering card to maximise my craft stash.
2) Cut a piece of card stock to 13.7 by 20 centimetres. Do not attach it to the card front yet.
3) Wrap a piece of the narrow ribbon around this piece of card about quarter of the way up. Attach a second bit of ribbon from 2 centimetres down on the left hand side to 9.5 centimetres down on the right hand side. Stick the ribbon down on the reverse of the card, this keeps the finished look much cleaner.
4) Stick the piece of card stock on to the front of your card. I like to use double sided tape for this, it keeps the edges neater than Pritt Stick and I find it holds the ribbon tighter.
5) Die cut two hearts, one from each colour of card stock. The die I used was 6.5 by 6.5 centimetres, I did not want the hearts to overpower the page.
6) Emboss each of the diecut hearts, using a different folder for each.
7) Stick the heart in the same colour as the background card onto the card front. It should be approximately 1 centimetre down the top ribbon, with about 1.5 centimetres above the heart of the base colour showing.
8) Stick the second heart onto the card, overlap the bottom 2 centimetres of the first heart. I used Pritt Stick to stick down the hearts, I like how it sticks paper to paper.
9) Using black ink, stamp Happy Anniversary on to a piece of card of the same colour as the second heart. I decided to heat emboss the sentiment, I did not want the ink to run on the pearlescent card and I like having the extra little bit of texture.
10) Trim the stamped piece card to 2.4 by 5.5 centimetres and attach to the lower piece of ribbon, leaving approximately 1.5 centimetres to the right of the sentiment. For this, I used double sided sticky tape to ensure edges.
11) Punch out two small hearts from card stock of the same colour as the sentiment box, and attach one in the top left and one in the top right corner of the sentiment box. You could punch the hearts out of the box, and have the base colour show through if you wanted instead.

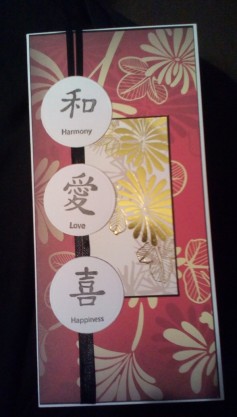
Tutorial for this Oriental card

image

The sketch used was the Mojo Monday Sketch 413.

I used:

  • papers and stamps from the Papermania Oriental Treasures collection
  • a DL card blank
  • black card stock
  • narrow black ribbon
  • white card
  • circular die and my Bigshot
  • adhesives (Pritt Stick, Colall All Purpose glue)

How to:

1) Cut a piece of black card to 9.5×20.7cm. This will leave a 1mm border all around; you can alter the size as you wish if you want more or less white border

2) Cut a piece of Oriental Treasures paper to 9.3×20.5cm and stick to the black card. This leaves a 1mm black border, alter as you wish. I used Pritt Stick to stick the paper down, I find wet glue is too wet for this and it buckles the paper, and I have had issues in the past with double sided sticky tape reacting with the paper (it was a cheap paper, but a pretty one).

3) Cut a piece of black card to 5.2×10.2cm. This leaves a large amount of the feature paper showing, you can use a large piece of black card here to create a larger feature of your other paper selection if you want.

4) Cut a piece of your second choice of Oriental Treasures paper to 5x10cm and stick to the black card. I chose a foiled card and wanted to keep it small so it did not drown out the rest of the card, but you can play with the size of this feature panel as you see fit.

5) Stick the panel from step 4 onto your panel from step 2. This should be approximately half way down the bottom panel and positioned to the right, however leaving a border of the bottom paper visible. I left a 5.2 cm gap above and below, and a 1.8cm border to the right.

6) Trim 2 pieces of narrow black ribbon to 1.5 cm longer than the panel in step 2 and stick lengthways along the panel, overlapping the smaller panel slightly (you might choose to let some of this smaller panel show to the left of the ribbon, I didn’t due to the size of my panel). Fold the ribbon slightly over each end of the panel and stick to the back, this keeps your card looking neater. I like to use a very little bit of Colall All Purpose glue to stick ribbon, I use a pin to transfer the glue from the tube to my project as it can be very stringy (like hot Mozzarella) and if you put too much glue on it can be very wet and buckle the paper.

7) Die cut three circles from white card. I used a 4cm diameter die; you could use a slightly smaller one and back it onto black card if you wanted.

8) Stamp each circle with one of the ‘Harmony’, ‘Love’ and ‘Happiness’ symbols and the coordinating word using black ink. I did think about heat embossing this, but as my smaller panel was foiled it seemed a bit too shiny for my tastes.

9) Stick these stamped circles along the ribbon. Place the middle one first, then it’s easier to get accurate placing of the other two. I wanted to keep my three close to the smaller panel so stuck one in the middle of the ribbon, and then one on each of the left hand corners of the paper. I used Pritt Stick to glue these down as I could glue them over the ribbon and not onto it, meaning I did not need to faff about with the wet glue.

Monthly roundup number 1

I cannot believe I am already one month into my Thrifty Crafting Pledge! Only 11 left to go. I have actually felt quite good about not being able to buy anything new for my stash overall, yes I’ve been tempted by a few things (if anyone were to gift me nesting star dies I’d be a very happy me), but I’ve really enjoyed turning out my collection and playing.

When I began, I decided to give a monthly summary of what I have made, anything I have bought and how I have been doing. This is my first one.

This month I have bought:
– two magazines I already subscribed to (I had agreed I am allowed these but not to buy any new ones)
– a Tim Holtz paper distressing tool
– 10 sheets of acetate
– I also won an A4 paper pad from the Crafters Companion Destinations range and 2 matching stamp sets; these have been hidden by hubby for when my Thrifty Crafting Pledge is over

During August I have made:
– paper organisers from 2 old cereal boxes, (upcycling my cereal box)
– storage jars from old tin cans (upcycling tin cans)
– 8 serene summer cards (Serene summer cards; Tutorial for a lovely summery card)
– 10 Christmas cards using Tonic Studios papers (retro Christmas cardlots of Tonic Studios cardsSimple, striking Christmas card )
– 15 Christmas cards using the Hunkydory Christmas Craftinator I bought back in June or July
– a birthday card for my brother using the Docrafts Roald Dahl collection
– loads of rosettes for scrapbooks and cards (repurposing books as rosettes)
– 6 scrapbook pages for my 8×8 scrapbook, using Papermania Back to Basics in Monochrome as a base (Scrapping happy)
– 5 cards using the free papers from this month’s issue of Cardmaking and Papercraft (pretty purples)
– 1  Christmas card using Lawn Fawn’s Winter Owl stamp set
– 1 shabby chic wedding card using the Lili of the Valley Romance stamp collection

I haven’t done any of my cross stitch or knitting this month as I have somehow hurt my thumb and can’t grip for long.

Next month I hope to continue my upcycling. I have been really pleased with the results of my projects to date and want to experiment more. I need to make some more Christmas cards, and essentially an anniversary card for hubby, and I’d like to make a start on making my Christmas decorations.

First MojoMonday challenge

image

image image

Last week I signed up to the MojoMonday sketches. Today being Monday, the first one came into my inbox and I shook the post-night shift sleep from my eyes and dug into my stash ready to create.

The sketch was a tall skinny design – as seen here: MojoMonday sketch 413. I used pre-made DL card blanks; I like the ease of having envelopes ready unless I’m making a more unusual shape card.

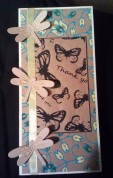
I have made two cards with very different feels. The first I used the Papermania Oriental Treasures collection, stamping three of the Chinese characters onto white card and die cutting them, then layering two of the papers. The second was made using Hobbycraft Printed Kraft papers and a dragonfly die I got free with a magazine.

More detailed tutorial will follow when I have had some sleep!

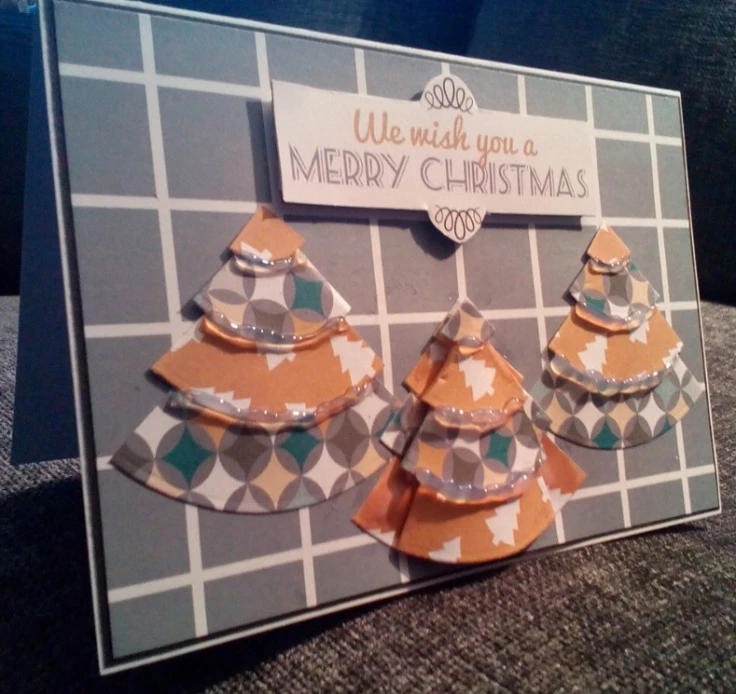
How to make this retro Christmas card

image

At the beginning of August, I bought the Tonic Studios Christmas Wishes paper pad. It has some gorgeous traditional designs, some modern designs and some very 60s and 70s inspired designs.

I have made several Christmas cards already using the more traditional design. I love the look of retro styles, but have always shied away from them in my crafting style as they are too bright and geometric for what I usually do.

In the spirit of my Thrifty Crafting Pledge, I intend to get full use out of all of my stash. This meant that I have to come up with new angles to my style so that I can use the retro designs.

For the current card, I decided to use a very simple layout so that I could use the bright and strongly patterned papers to their full advantage.

How to make this card:

You need:
A card blank. I used an A6 (14.8×10.5cm) blank in a tent fold orientation.
Tonic Studios Christmas Wishes paper pad – three different designs and the ‘we wish you a Merry Christmas’ topper
Black card
Liquid Pearls
Circle nesting dies and a die cutting machine
Adhesive and scissors

What to do:
1) Cut a matting layer from black card. The layer I used was 14.6×10.2cm. I like to have a small bit of the white showing to really frame that layer as well.
2) Cut your background paper. For my card, this layer was a grey, chequered paper cut to 14.4×10.0cm, to leave a 1mm border all around. You could add a third layer and use a smaller border if you want a more complex base.
3) Attach the layers together and onto the card front. I always use Pritt Stick for this, I have had papers react to double sided tape in the past and it is not an attractive look.
4) Cut out your sentiment and attach to card. I attached mine along the top of my card, in the centre. I used foam pads to give the card depth. If you want, you could back this with black card as well; I wanted to keep my design as simple as possible so did not want extra layers.
5) Die cut 4 circles from each of the other two papers and cut these into quarters. You need 8 circles all together, enough for 8 trees. I only have 5 nesting circles. I used the smallest four which range from 2 centimetres diameter up to 8 centimetres diameter. For the size of the card, this is plenty big enough, larger would be too daunting.
6) Glue the quartered circles together using alternate papers. Largest on the bottom, with successive sizes overlapping so the smallest is on the top. I left about 120mm of each quarter showing, meaning the next layer stuck off the sides slightly, creating a tree shape. Again, I used Pritt Stick to attach the layers.
7) Attach one tree to the left hand side of the card, leaving a gap below. Attach matching tree in same position on opposite side. I left a 2cm gap under each tree, and a 2mm gap beside them.
8) Attach one tree to bottom middle, overlapping existing trees slightly. I used a tree with the opposite papers for this.

image

9) Optional extra details:
– take tree matching middle tree, fold under 1cm from each side of the lowest layer, 70mm from next and 20mm from third layer. Glue along the folded parts and attach to the middle tree. If you don’t glue the middle, it creates a slightly rounded effect.
– create a snowy look by unevenly applying Liquid Pearls along the joins between the layers.

image

Repurposing books as Rosettes

Today, I would like to share with you how I make rosettes for my cards and scrapbooks. I know that a lot of people have their own techniques, this way is how I do it.


imageYou will need:
Paper
Something to cut with
Glue
Circles of paper (or a die/punch to cut them)
A score board, or a ruler and blade.

image 1) Cut two strips of paper, and if using a punch or die, a circle from the same or a complementary paper.

I used strips two centimetres deep this creates a rosette approximately 4 centimetres in diameter. Use different sized strips to create different size rosettes. If your strips are 25cm plus you may find one is enough.


2) Score at regular intervals along the length of each strip. image

I use a scoreboard for this, but you can use a blade and as long as you do not go through the paper. You do not have to go as far as the end, but it doesn’t make it a lot easier to fold.

image


image3) Fold along your scored lines in a concertina fashion.


image4) Attach the ends of both strips of paper together to create a circle.

I find it is easier to attach one set of ends and let the glue dry for a couple of minutes before completing the circle.


image5) Squash the circle down, ensuring the middle is well folded.

This is quite fiddly, especially if the paper is light weight. If you’re struggling, make sure your folds are nice and sharp.


image6) Using wet glue, attach the small circle of card or paper into the centre of your rosette.


image7) Place the rosette under something quite heavy (ideally with a non-stick bottom) and leave until the glue has dried.

I usually use my tea cup for this, but for taking the photo I have used the lid of a well known brand of candle which has worked well.


8) When I fasten these on to cards or into scrapbooks, I like to use double sided sticky tape as it gives a good firm hold.

Using different papers gives a very different feel to the rosettes. You can apply a button in the middle, but I would advise you to the apply the paper circle first as it can be difficult to get the button to stick otherwise.

I would like to say that in general I do not like destroying books. The book I used was John le Carre’s Tinker Tailor Soldier Spy. It was my dad’s favourite book but I did not enjoy it. I did not feel able to throw it away or give it to charity when he died and I have used it to create embellishments for pages which feature him; this way I feel that I am remembering him.

Create a free website or blog at WordPress.com.

Up ↑